Modifying traffic with rules
Capturing traffic shows you what is happening. Rules let you change it. A rule in Fluxzy pairs an action (what to do, for example add a header or add latency) with a filter (which traffic it applies to). When traffic matches, Fluxzy applies the action live, in both directions, on HTTP/1.1, HTTP/2 and WebSocket over plain or decrypted TLS.
This guide shows how to create, scope, and manage rules from the Fluxzy Desktop UI, with three practical examples you can copy.
TL;DR. Open the Rules manager from the title bar, click Add rule, pick an action, fill in its settings, choose Apply When (a filter or Any), then Save. The rule turns green in the ENABLED column and applies to matching traffic from then on.
Platform note. Screenshots below are from the Windows app. The workflow is identical on macOS and Linux.
What you can do with rules
Fluxzy ships with more than 50 built-in actions, grouped by what they touch:
- Request modification: add, update or remove request headers, change the method or URL path, inject Basic or Bearer authentication, set cookies.
- Response modification: add, update or remove response headers, set response cookies, mock a response, inject content.
- Network and routing: forward a request to another server, spoof DNS, set an upstream proxy, resolve names over DNS-over-HTTPS.
- Security and certificates: use a client certificate, skip certificate validation, force an HTTP version, set a JA3 fingerprint, impersonate a browser.
- Debugging and analysis: add a delay, throttle bandwidth, apply a comment or tag, write to a file.
- Session and cache: capture and replay session data, clear sessions, remove cache.
You combine any action with a filter so the change hits exactly the traffic you want and nothing else. The full, searchable list of actions and filters lives on the actions and filters reference.
Open the Rules manager
Click the rules button in the title bar (the bolt icon, next to Settings). The number on it is how many rules are currently active.

You can also open it from the status bar, where Fluxzy always shows the active-rule count, or with Ctrl+T / Cmd+T to open the search-everywhere tool and typing Manage rules.
![]()
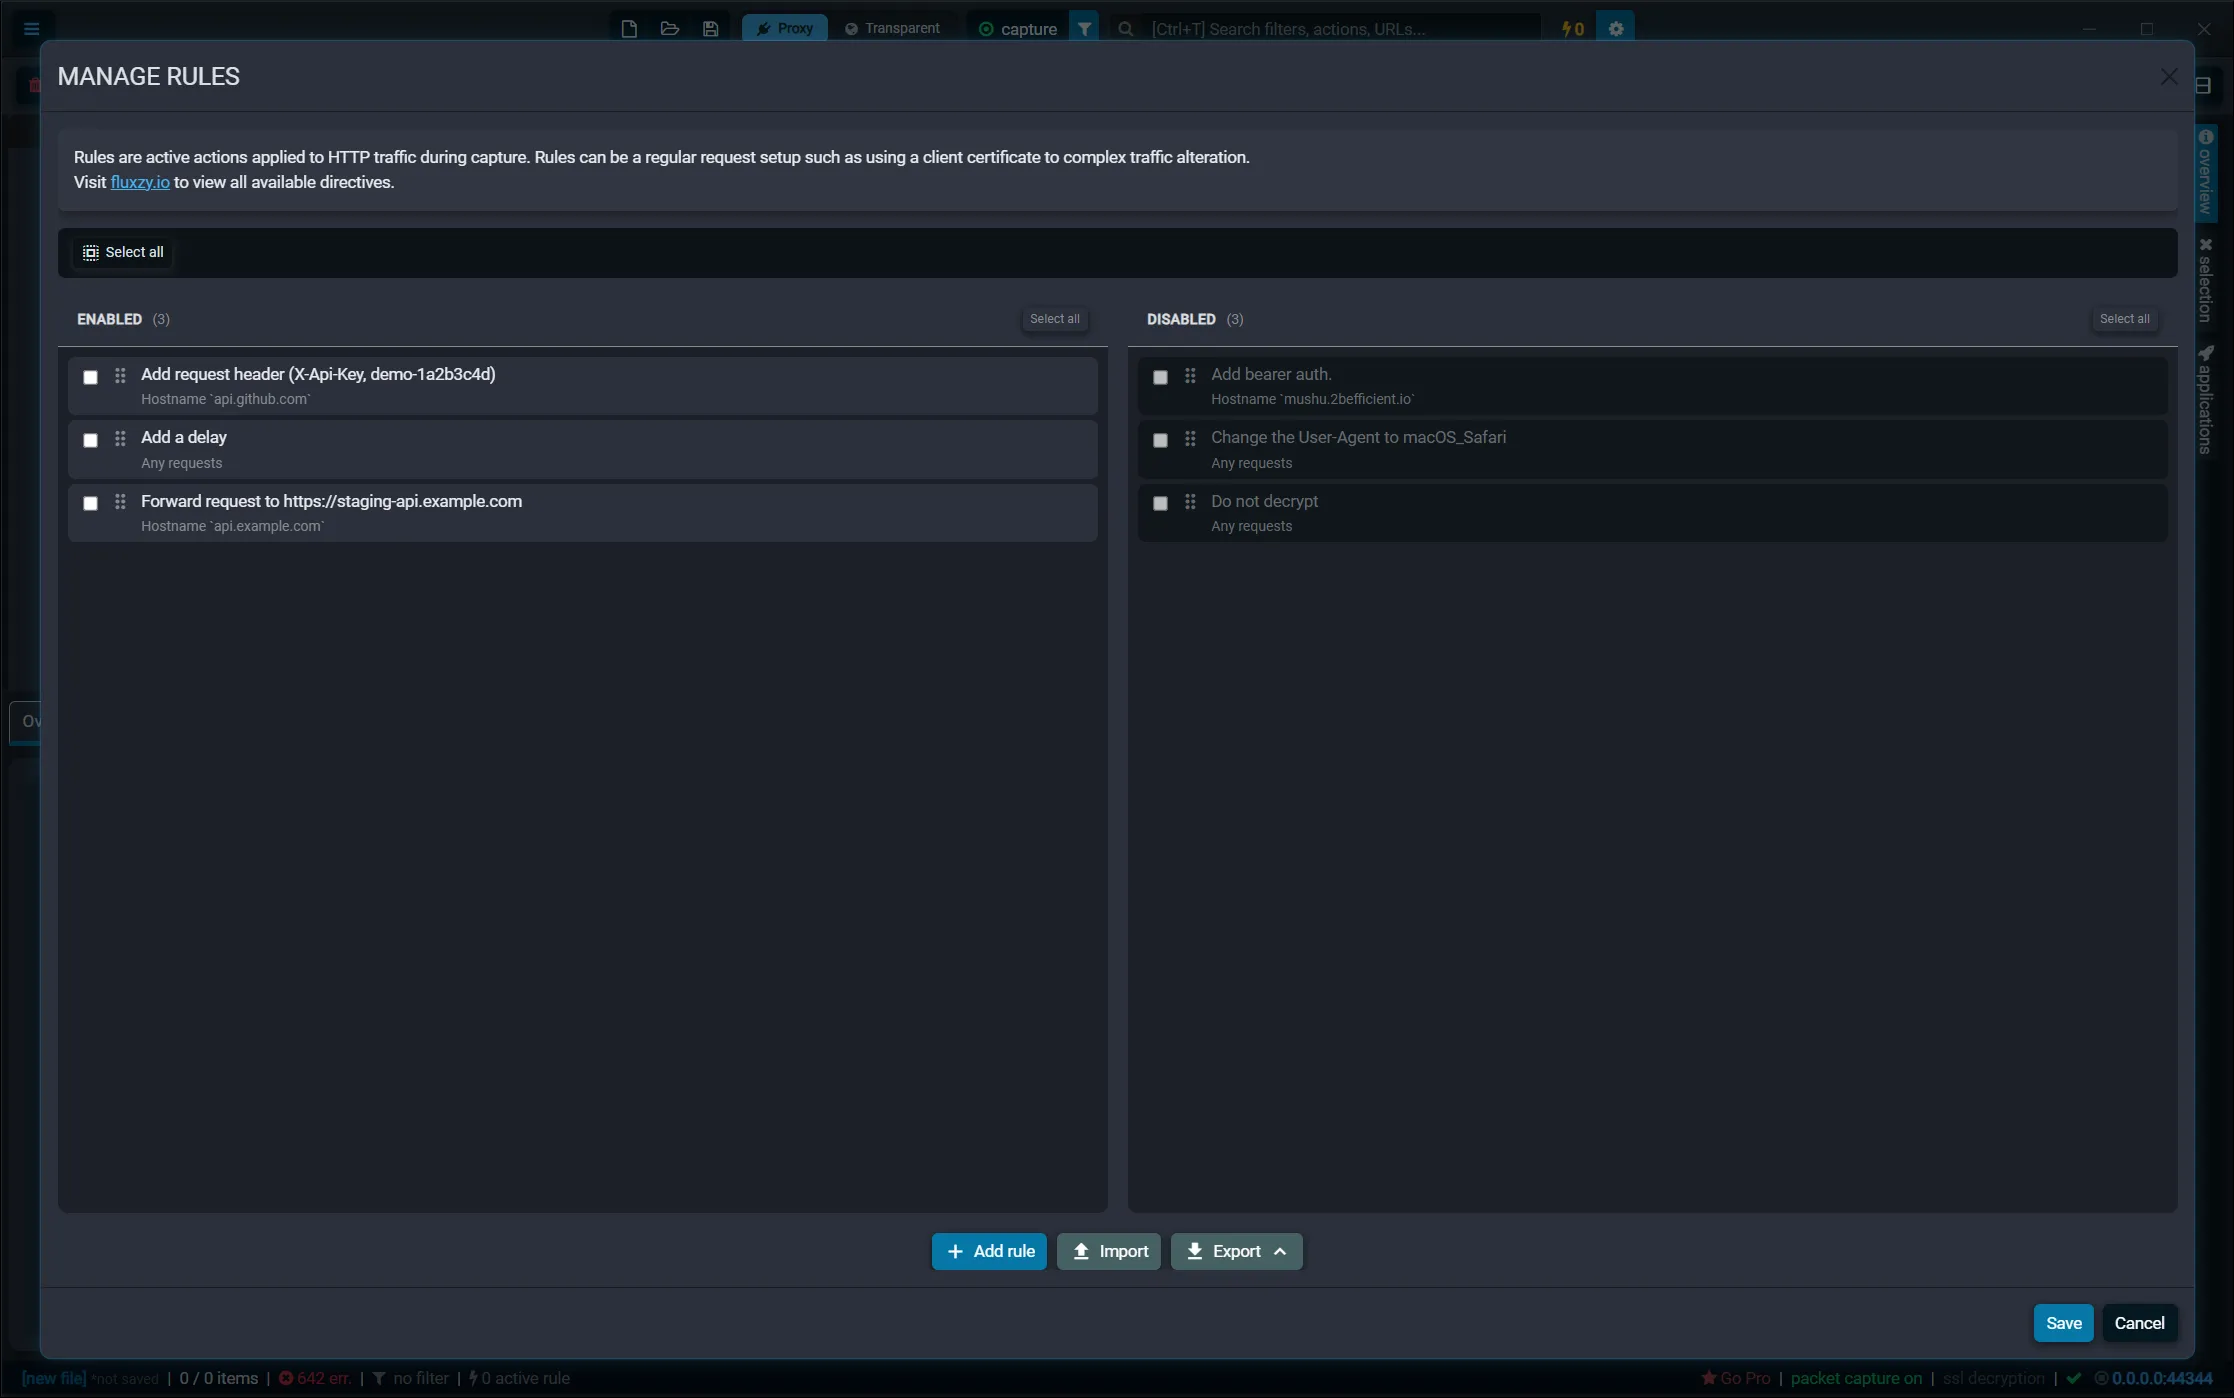
Every entry point opens the Manage Rules dialog. Rules live in two columns:
- ENABLED: rules that are active and applied to captured traffic.
- DISABLED: rules you keep around but that are not applied.
Each rule card shows its action name on top and the filter (its Apply When condition) below.
Create a rule, step by step
Rules are created the same way regardless of the action. Here is the full flow.
1. Click "Add rule"
At the bottom of the Manage Rules dialog, click Add rule. The action picker opens.
2. Pick an action
The Select an action dialog lists every available action, grouped by category. Browse the categories, or type in the search box to filter by name or description.
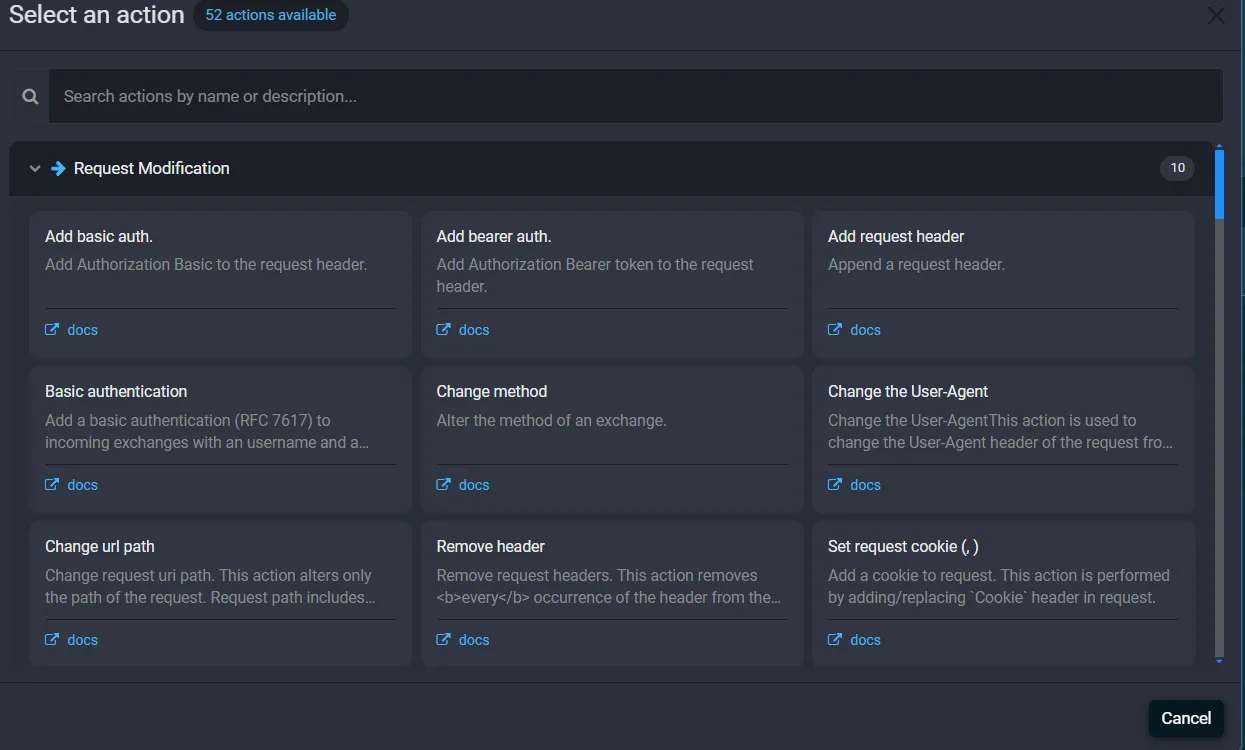
Click an action card to choose it. Fluxzy opens the rule editor.
3. Configure the action
The rule editor has two sections. The Action section at the top holds the settings for the action you picked. Fields differ per action: a header action asks for a header name and value, a delay asks for a duration, and so on. The Docs link opens the reference page for that action.
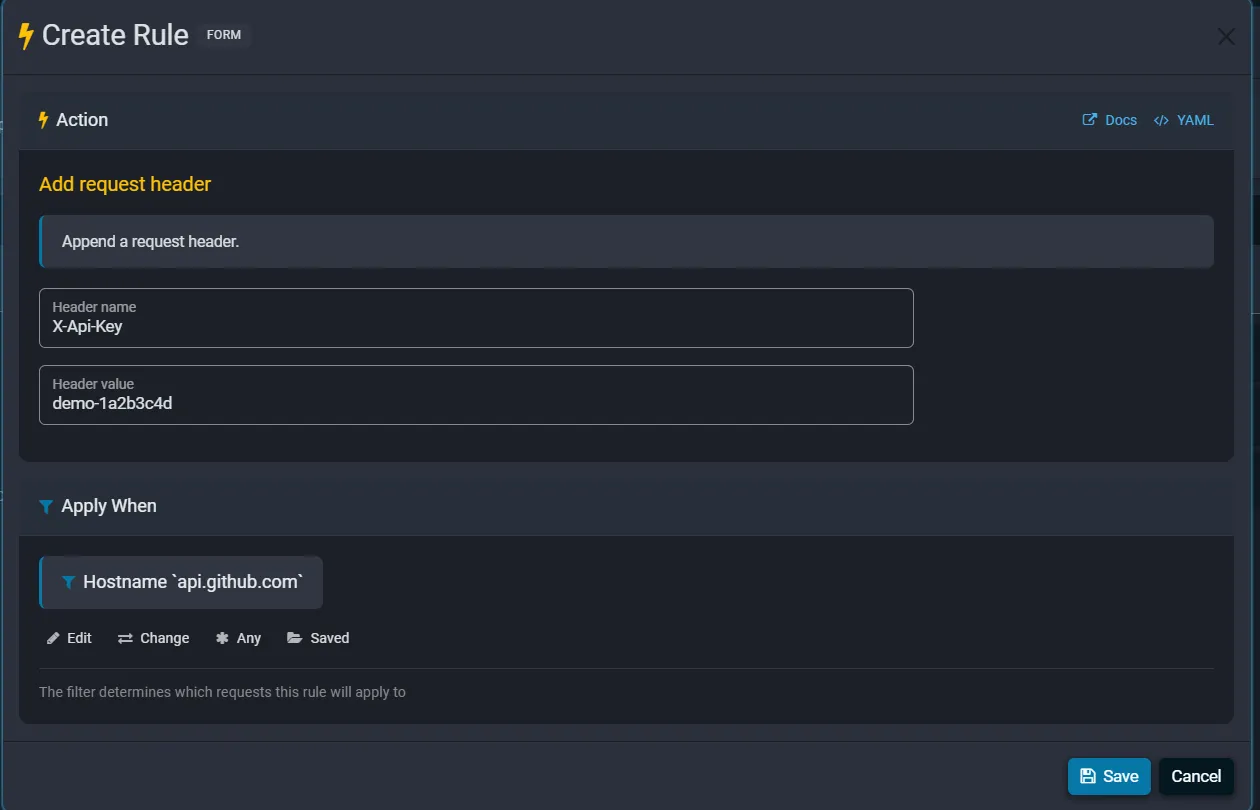
4. Choose "Apply When"
The Apply When section decides which requests the rule runs on. It shows the current filter as a badge, with four controls:

- Edit: change the settings of the current filter.
- Change: pick a different filter from the filter library.
- Any: apply the rule to every request (no filter).
- Saved: load one of your previously saved filters.
If you leave it at Any requests, the action runs on all captured traffic. To scope it, click Change and choose a filter (covered next).
5. Save
Click Save. The editor closes and your new rule appears in the ENABLED column. Click the dialog's Save button to persist your rule set. New rules apply to traffic captured from that point on, so they do not retroactively change exchanges already in the list.
Scope a rule with Apply When filters
A filter is what makes a rule precise. From the Apply When section, click Change to open the filter library.
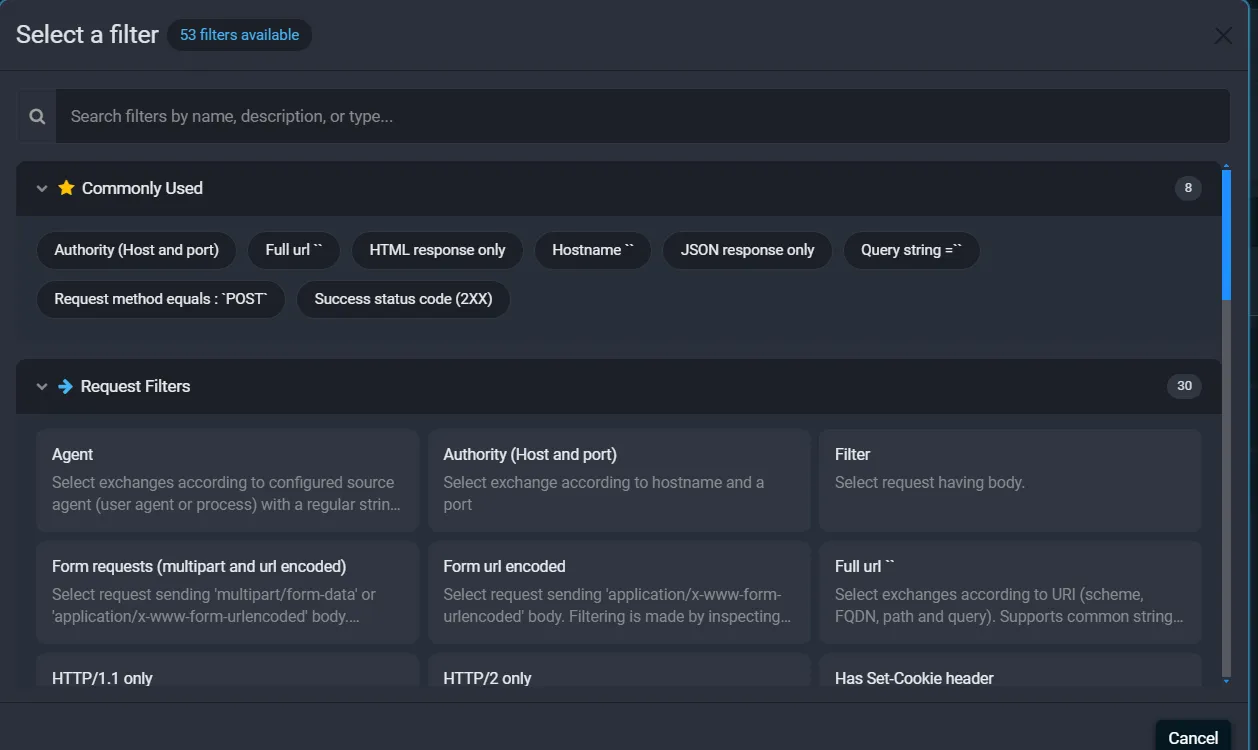
The Commonly Used row gives you quick access to frequent filters such as Hostname, Authority (Host and port), Full url, Request method, and Success status code (2XX). Below that, filters are grouped into request, response and general filters. Use the search box to find one by name.
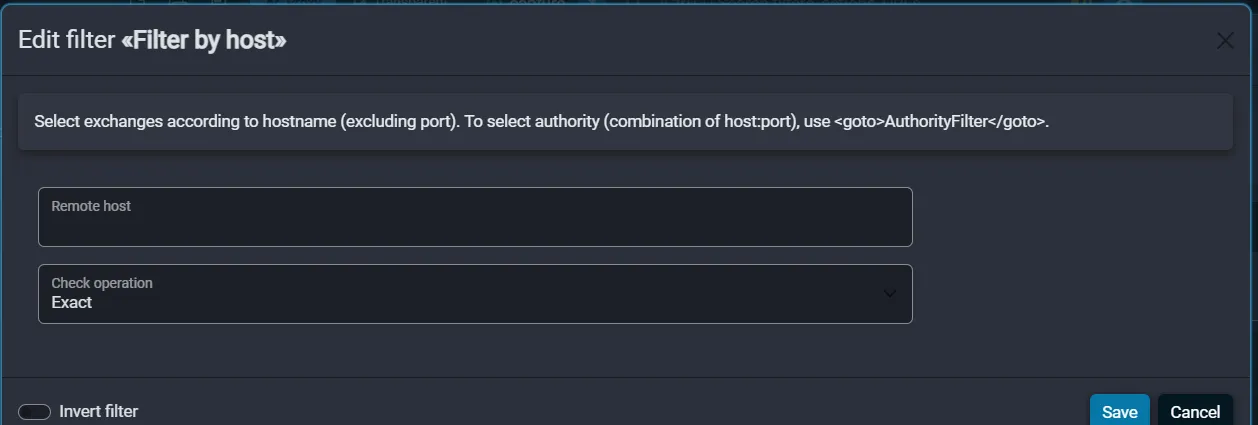
When you pick a string-based filter like Hostname, Fluxzy asks for the value and how to compare it. For a hostname you enter the Remote host and a Check operation: Exact, Contains, StartsWith, EndsWith, or Regex. The Invert filter toggle makes the rule apply to traffic that does not match.
Click Save and the filter badge in Apply When updates to reflect your choice. For more on building and reusing filters, see searching and filtering traffic.
Tip. A "Rule is out of scope" warning appears if the filter inspects data the action runs before. For example, a rule that changes a request cannot be filtered on a response status code, because the action fires before the response exists. Pick a filter that matches the action's stage.
Example 1: Add or update a request header
Injecting a header is the most common rule. Use it to add an API key, a tracing header, or a feature flag to requests going to one host.
- Add rule, then choose Add request header (under Request modification).
- Enter the Header name (for example
X-Api-Key) and the Header value (for exampledemo-1a2b3c4d). - In Apply When, click Change, choose Hostname, and set the host (for example
api.github.com) so the header is added only to that API. - Save.
Every matching request now carries your header. Notes:
- Add request header appends the header. To replace the value of a header that may already be present, use Update request header instead.
- To inject authentication, the dedicated Add bearer auth. and Add basic auth. actions build the
Authorizationheader for you. - The same pattern works on responses with Add response header and Update response header.
Example 2: Simulate a slow network
To test how your app behaves on a poor connection, add latency to matching traffic.
- Add rule, then search for and choose Add a delay.
- Set Duration (ms), for example
750for a three-quarter-second delay. - Leave Apply When at Any requests to slow everything, or scope it to one host or path.
- Save.
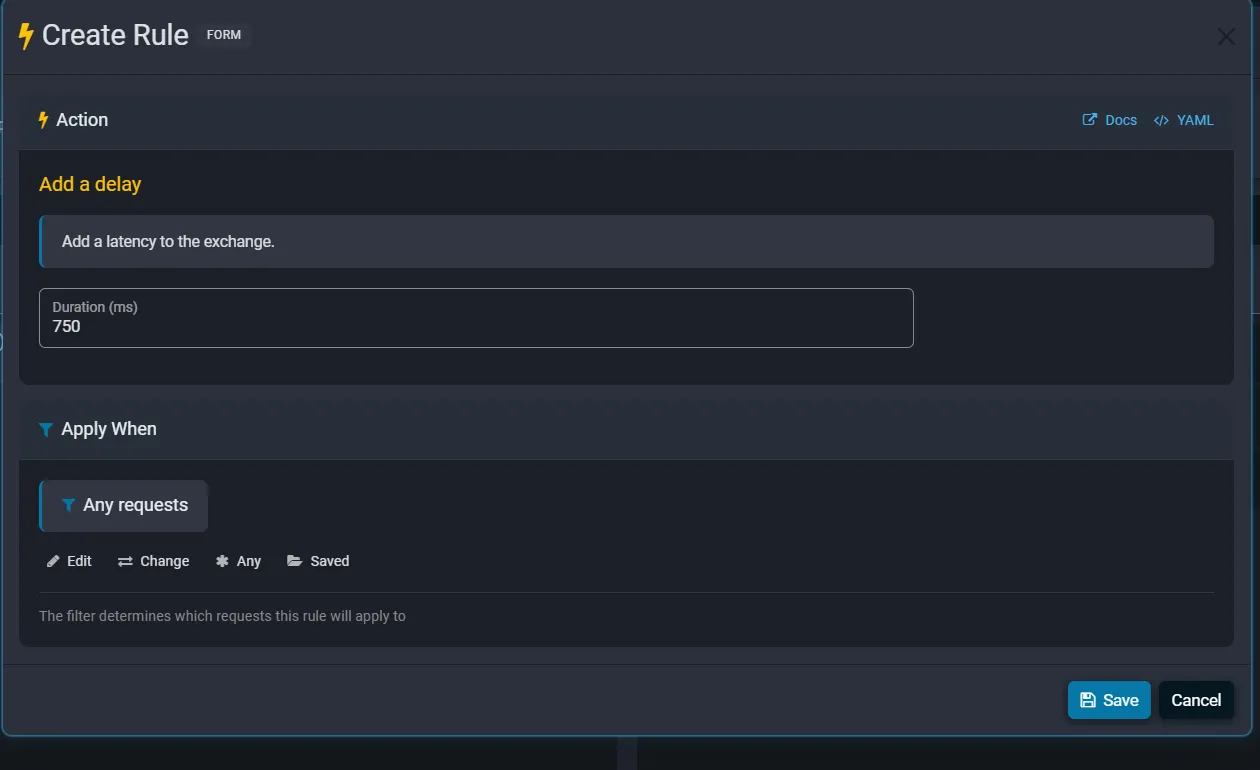
Fluxzy holds each matching exchange for the duration you set before continuing. To cap throughput rather than add a fixed delay, use the Throttle action, which limits bandwidth instead of time.
Example 3: Forward requests to another server
The Forward request to action makes Fluxzy act as a reverse proxy: matching requests are sent to a URL you choose instead of their original destination. This is handy for pointing a production host at a staging environment without touching the client.
- Add rule, then choose Forward request to (under Network and routing).
- Enter the target in Forward request to the following URL, for example
https://staging-api.example.com. It must be an absolute URL. - In Apply When, scope it to the host you want to redirect (for example
api.example.com). - Save.
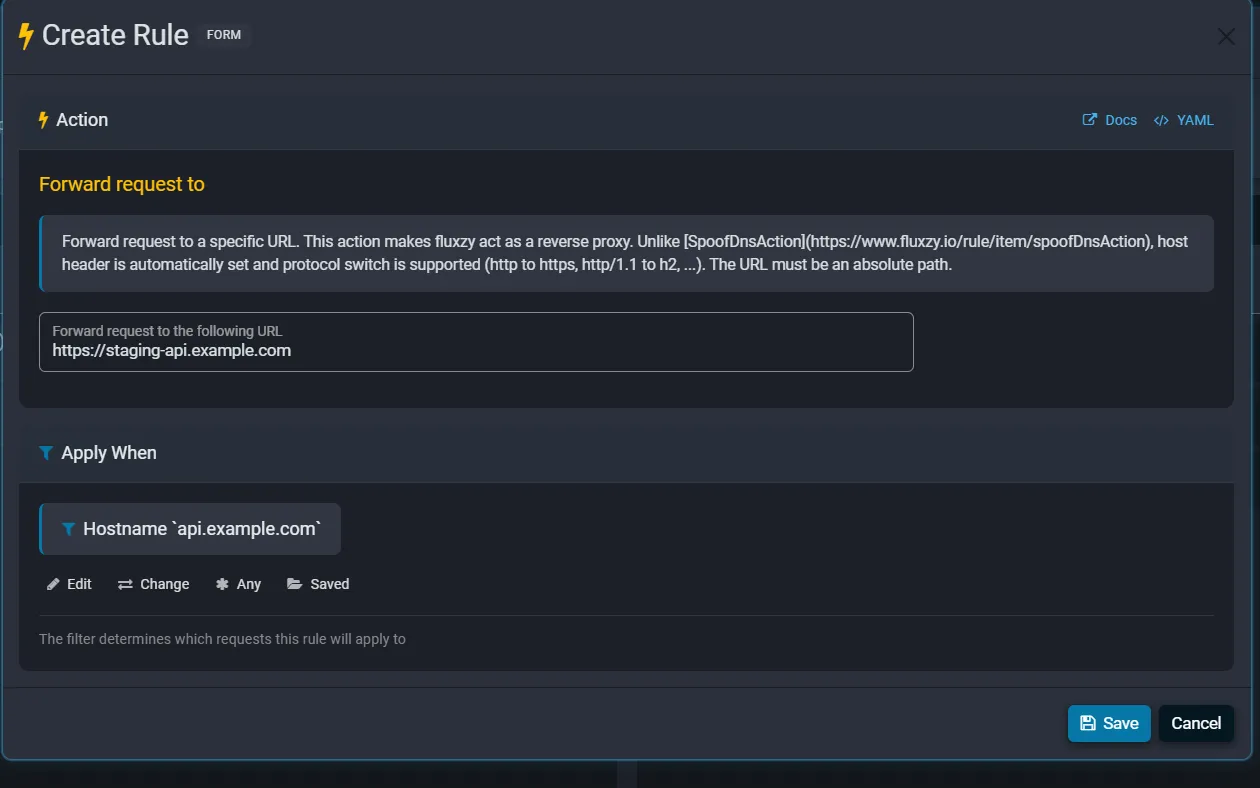
The host header is set automatically, and Fluxzy can switch protocol on the way (for example HTTP to HTTPS, or HTTP/1.1 to HTTP/2). If you only need to point a hostname at a different IP or port rather than rewrite the URL, use the Spoof dns action instead.
Manage your rules
Back in the Manage Rules dialog, hover a rule card to reveal its controls.

From left to right on each enabled card you can:
- Move up / Move down: change the order. Rules run top to bottom, so order matters when more than one rule matches the same traffic.
- Disable: move the rule to the DISABLED column without deleting it.
- Edit: reopen the rule editor.
- Duplicate: copy the rule as a starting point for a similar one.
- Delete: remove the rule.
You can also drag a card between the ENABLED and DISABLED columns, reorder by dragging, and use the checkboxes plus the selection toolbar to enable, disable or delete several rules at once. Click the dialog's Save to keep your changes, or Cancel to discard them.
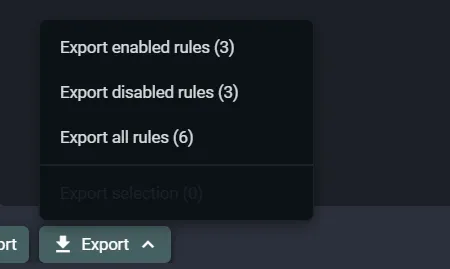
Import and export rules
Rules can be shared and backed up. The bottom bar of the Manage Rules dialog has Import and Export. The Export menu lets you write out the enabled rules, the disabled rules, all rules, or just your current selection.
Rules are stored as plain YAML, so an exported file is easy to read, diff and keep in version control. The forward rule from Example 3 looks like this:
rules:
- filter:
    typeKind: HostFilter
    pattern: api.example.com
  actions:
  - typeKind: ForwardAction
    url: https://staging-api.example.com
Import loads rules from a file (or pasted YAML) back into the dialog, so you can hand a teammate the exact setup you used. For the YAML syntax and how to apply a file at startup, see importing YAML rule files.
Troubleshooting rules
My rule does not seem to apply
- Confirm the rule is in the ENABLED column, not DISABLED.
- Check the Apply When filter actually matches your traffic. A too-narrow hostname or a
StartsWiththat does not match the path is the usual cause. - Remember rules apply to traffic captured after they are enabled. Re-issue the request.
- If several rules touch the same request, an earlier one in the list may already have changed it. Reorder them.
I see a "Rule is out of scope" warning
The filter inspects a stage that runs after the action. Switch to a filter that matches when the action fires (a request action needs a request-stage filter).
The header I added shows up twice
Add request header appends. If the header was already present, use Update request header to replace it instead of adding a second copy.
Frequently asked questions
Do rules change traffic in real time?
Yes. Enabled rules are applied to matching exchanges as they pass through Fluxzy, in both the request and response direction.
In what order do rules run?
Top to bottom within the ENABLED column. When multiple rules match the same exchange, they all run, in order. Drag rules or use the move up and move down buttons to control precedence.
Can I apply a rule to every request?
Yes. In Apply When, click Any. The rule then runs on all captured traffic with no filter.
How do I turn a rule off without losing it?
Use the Disable control on the card, or drag it to the DISABLED column. The configuration is kept and can be re-enabled any time.
Can rules disable TLS decryption for a host?
Yes. The Do not decrypt action tunnels matching HTTPS traffic without decrypting it, which is useful for hosts that pin certificates. Scope it with a hostname filter.
Can I share a rule set with my team?
Yes. Use Export to save your rules to a file and Import to load them on another machine. Because rules are YAML, they fit naturally in version control.
Next steps
- Capture and decrypt traffic first with Capturing HTTPS traffic.
- Pause and edit individual requests live with breakpoints and live edit.
- Mock a full response body for an endpoint without a backend.
- Browse the complete actions and filters reference.